Next: 5 Alignment Tools Up: ordalie_documentation Previous: 3 Ordalie Basics Contents
There are mainly two types of tools in Ordalie: tools that query or add information (Search, Identity, Tree, Conservation, ...) and tools that change the current snapshot (Editor, Cluster, Feature etc ...). There are shortcuts that allow to enter a tool using the keyboard :
| Key | Tool |
|---|---|
| <Shift + A>, <A> | Annotation |
| <Shift + C>, <C> | Conservation |
| <Shift + E>, <E> | Editor |
| <Shift + F>, <F> | Feature tool |
| <Shift + G>, <G> | Clustering |
| <Shift + I>, <I> | Identity |
| <Shift + M>, <M> | Search motif |
| <Shift + S>, <S> | Superpose |
| <Shift + T>, <T> | Tree building |
This tool is used to query information on identity percentages between sequences.
The 'Compute' button calculates the identity percentage between selected sequences for the selected residue range. A summary of the computation is logged. The selection of two sequences for which the identity percentage is desired is done with the following two comboboxes. The identity percentage and the length of the two ungapped sequences is then given.
The 'Summary' button will make a window appear that will give for the whole sequence and for each group :
The 'Return' button will leave the Identity tool.
This tool allows the user to search for a particular sequence motif inside the alignment.
The syntax of the search pattern follows the rules of the FindPatterns program of the GCG Wisconsin Package [15]. The following subsections are adapted from the FindPatterns documentation.
The search pattern can include any legal sequence character, and also include several non-sequence characters, which are used to specify 'OR' matching, 'NOT' matching, 'begin' and 'end' constraints, and repeat counts. For instance, the pattern GASTE(X){20,30}FTG means searching GASTE, followed by 20 to 30 of any amino acid, followed by FTG. Following is an explanation of the syntax for pattern specification.
Sometimes, it is posssible to leave out part of an expression. If braces appear without preceding parentheses, the numbers in the braces define the number of repeats for the immediately preceding symbol. One or both of the numbers within the braces may be missing. For instance, both the pattern GASG{2,}F and the pattern GASG{2}F mean GAS, followed by G repeated from 2 to 350,000 times, followed by F; the pattern GASG{}F means GAS, followed by G repeated from 0 to 350,000 times, followed by F; the pattern GAS(TE){,2}F means GAS, followed by TE repeated from 0 to 2 times, followed by F; the pattern GAS(TE){2,2}F means GAS, followed by TE repeated exactly 2 times, followed by F (If the pattern in the parentheses is an OR expression (see below), it cannot be repeated more than 2,000 times).
The pattern <GACCAT can only be found if it occurs at the beginning of the sequence range being searched. Likewise, the pattern GACCAT> would only be found if it occurs at the end of the sequence range.
The Control panel is limited to the motif entry box in which the pattern should be entered, the 'Search' button to launch the search, the 'Find Next' button to go to the next occurence of the motif, and the 'Return' button to leave the search tool.
When a motif is found, the background of the snapshot window will become black, and the motifs will be highlighted in red.
All information attached to a protein that is not a feature can be viewed and/or edited in Ordalie. Depending on the origin of the alignment (fasta/msf/clustal or Macsim/ORD files) some fields may be empty.
When browsing or editing sequence information, a selector will appear at the top of the window to select the protein of interest. If this protein presents some unusual characteristics (unknown amino acids, the sequence corresponds to a fragment, ...) a red warning will appear on the left of the window.
The information is arranged in four frames.
Some information can be edited to set them or to correct them. Editable fields are : 'sequence name', 'accession number', 'Bank Id', 'description', 'Organism', 'Taxa Id', 'life Domain' and 'E.C.'.
|
|
||
The changes are applied as soon as the 'OK' button is pressed.
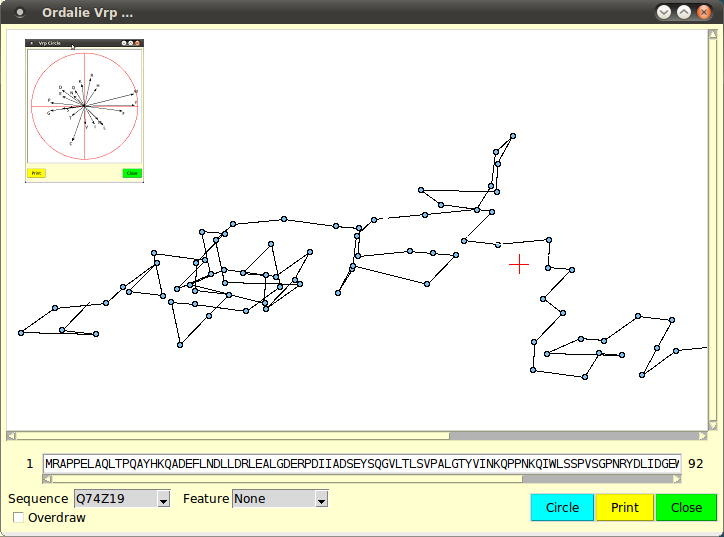
The VRP (Vectorial Representation of Protein) tool is a tool that may be used to define protein characteristics in a graphical manner. The protein sequence is here represented as the path of successive amino acids taken as vectors. The vectorial equivalence of each amino acid is given by a multidimentional scaling of the PAM250 similarity matrix [2].
When opened, the top part of the window displays the VRP of the first protein in the snapshot. Each dot corresponds to an amino acid, and clicking on a dot with <Button-1> display its name and position in the sequence. The VRP can be moved around by dragging the mouse with <Button-1> down. Dragging the mouse with <Button-3> down will zoom the drawing in and out.
On top of the Control panel is the sequence of the currently selected protein. If a dot has been picked in the drawing area, its corresponding residue will be displayed with a red background in the sequence window. By clicking on a residue in this sequence window, its corresponding dot will be displayed and labeled in red.
Sequence selection is done through the 'Sequence' combobox. At the top of the combobox there are items named 'All' and, if applicable, 'GroupX' where X is an integer indicating the group number. This allows the display of the VRP of the whole snapshot or of the groups if present. The group VRP is done by drawing, for each column of the snapshot, the average vector of the column scaled by the number of residues inside the column.
By checking the 'Overdraw' checkbox, the display is not cleaned between each VRP rendering, allowing the display of several VRPs at the same time.
The 'Feature' combobox will select a feature to be mapped onto the VRP drawing. No feature is mapped when dealing with a group. The 'Circle' button displays the amino acids vectors used to build the VRP, the 'Print' button creates a PNG image of the current VRP drawing and the 'Close' button closes the window.
Features in Ordalie may come from the original alignment file (Macsims/XML or ORD files), from within Ordalie (residue conservation computation for example will create a new feature), loaded from the feature file format (see section 7.4) or defined by the user. This tool is dedicated to feature management.
The Control panel of the 'Features Editor' is really simple.
It consists, from left to right, in :
![[*]](crossref.png) .
.
It is important to understand the difference between a Feature and an Item of a Feature. Here, a Feature represents a set of instances of a given sequence characteristic that may be distributed over the whole snapshot. A Feature Item, or Item for short, is one instance of a Feature for a given sequence at a given place in the snapshot.
Contrary to all other tools, it is possible to interact directly with the features inside the snapshot window. A right click makes a contextual menu pop up, allowing several actions.
|
|
||
|
|||
After having selected Items(s) or region, several option are then available.
If the 'Feature Name' entry is filled with an already existing feature, then the new item will be added to the item list of that feature. If the 'Feature Name' does not exists, a new feature is then created. In all cases the user is supposed to give to the item at least a Color and optionally a Score and a Note.
 .
.